Embellishing your plain fabric or home accessories with rhinestones is an easy and fun way to add sparkle and glamour to your creations. With a rhinestone transfer, you can customise your gear or upgrade your purse in many ways.
Now, making a rhinestone transfer can seem intimidating. However, our extensive guide will provide a thorough step-by-step process for making a rhinestone transfer to add brilliance to your outfits.
Materials Needed for a Rhinestone Transfer
- Rhinestones: Use high-quality rhinestones, such as Swarovski, Czech, or Preciosa, with your preferred shape, size, and colour, all available at https://www.bluestreakcrystals.com/collections/flat-back-crystals-rhinestones-all-brands. Flat backs, particularly hotfixes, are better suited for transfers.=
- Rhinestone transfer masks: This is necessary to hold the rhinestones in place when applying them to a fabric
- Fabric: This could be your denim, handbag, shirt, or anything you want to apply the stones on
- Design template: You can create one using design software.
- Rhinestone brush
- Template flock
- Vinyl cutters
- Squeegee
- Heat presses or pressing iron
Step-by-Step Guide for a Rhinestone Transfer
Step One: Create a design for your rhinestone transfer or find one online. Adjust the design and consider all necessary dimensions, then proceed to print. You can also make your design by hand.
Step Two: Load your flock into the cutter. Make sure it is facing up while loading it.
Step Three: Export your stone design to the cutter using your system software. The design will be imprinted on the flock. Template flock is often cut at a higher pressure using a 60-degree blade.
Step Four: Peel the flock from its liner once it has been cut. This displays the holes you made in your cutter for the rhinestone placement.
Step Five: Next, gently place the sticky side of your flock on the template board.
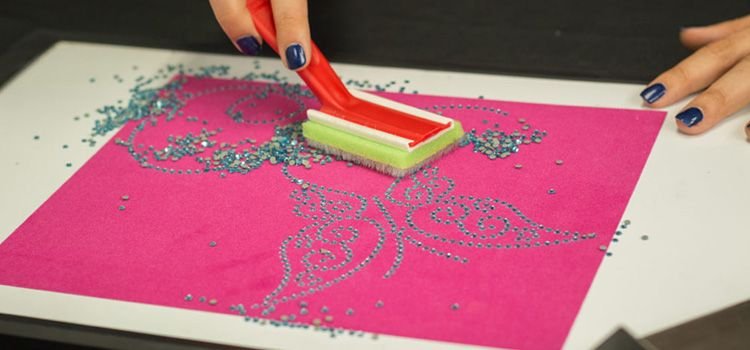
Step Six: Gather your rhinestones and place them gently on your board. Carefully place them in the ideal order per your design with your rhinestone brush. Typically, the stones will fall into the right holes. Occasionally, the rhinestones will be angled upside or wrongly. In such instances, just pick up the stones with tweezers and put them firmly in their place.
Step Seven: You’ll need your rhinestone transfer mask once your stones are securely in place. Remove the liner and gently lay the adhesive part on your rhinestone design, exerting steady pressure. If you’re working on a huge design, we recommend using a squeegee to ensure the stones adhere correctly. For tiny patterns, you may use your hand.
Step Eight: Now for the transfer. After allowing the adhesive to rest for a few minutes, prepare your fabric or accessories by removing any wrinkles or stains. Next, remove the rhinestone transfer mask from the flock and place it face down on the fabric.
Note: If you notice some stones have failed to stick, gently place them back down, apply pressure, and slowly peel them off again.
Step Nine: Check that it is properly aligned after laying it on the fabric. Then, using a heat press or an iron, apply heat and pressure to the cloth, whichever is more appropriate for the fabric type. Afterwards, gently pull off the transfer mask from one end to the other, ensuring all rhinestones have completely adhered to the cloth.
Step Ten: After properly applying the mask to the cloth, give it one more press with the heat press for roughly 10 to 20 seconds to ensure longevity. Finally, let the cloth cool for a few hours before wearing it.
And there you have it! Your very own personalised fabric is designed using a rhinestone transfer. Not so hard, is it?
By applying your knowledge of this transfer, you can explore multiple design possibilities and concepts, whether you’re a jewellery maker, fashion designer, or interior decorator.
Furthermore, you can experiment with various styles and cater for an array of preferences using any rhinestone crystal of your choice, including Serinity, Preciosa, Estella, or the most luxurious of them all, Swarovski, in whatever shape, including bicone, heart, teardrop, bicone, amongst others, all with the same technique.
Conclusion
With a rhinestone transfer, you can make customised creative designs. Whether you’re designing a bag, glassware, denim, shoe, tote bag or any accessory, you can easily add a touch of glam and explore creative patterns with this technique.
Following our extensive step-by-step guide, you’ll transform plain fabrics into works of art in no time. You may make a few mistakes initially, and the outcome may not turn out well. Don’t be discouraged, simply go through the guidelines again and carefully apply each step.

